Today, I took my signatures and made them into a 4 1/4 x 5 1/2 inch journal.
The process (except for the cutting) is easy. Close pins and office clips help secure the signatures until the glue dries. I ran out of gauze that I lay over the glue to give extra security to the binding, so I used cotton lace. Improvising is one of my favorite skills.
As the glue dries, I begin measuring and cutting the book board. Counting fractions and worrying about sharp edges, calculating numbers and drawing straight lines, shake my steady hand. "Measure twice, cut once", says every good carpenter, but does any of it sink in to my eye-hand coordination? No. Yet, I keep trying to stay straight and avoid the crooked lines. The longest part of making a journal is the cutting. Even with a metal ruler, a very sharp blade, I still feel crooked edges creeping into my book board. But I keep trying. Someday, I'll stop seeing crooked and everything will straighten out.
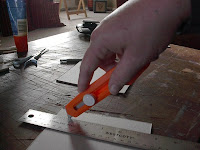
The outside book board is covered with a heavy weight paper. I found a textured white sheet of paper at Reuel's Art Supply.
Since I wanted to make a Valentine's journal, I chose the white paper to cover the book board and a red scrap book paper for the inside. One side of the scrap book paper is glued to the book board to give a finished look to the inside.
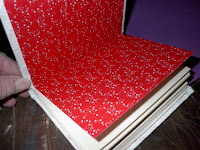
The finished project fits nicely in a gift box and it a perfect present to give a loved one to record their thoughts, or to hold precious photographs.
Sunday, January 17, 2010
Saturday, January 16, 2010
What Is In A Signature?
I found my new favorite store. It's called Paper Plus. The store is full of reams of paper in every imaginable color and weight. The store also has boxes, bags, and envelopes for packaging. I spent about 45 minutes looking around, this past Friday evening, and brought home some great paper to make journals. And so, my weekend project begins....
I remember when I first wanted to make a journal. I spent most of my time on the Internet researching the process. As with any new process, there is verbiage to learn. My first new word is signature. Signature is a group of folded paper sewn together.
I place four sheets of folded paper together and then hand sew them to bind the loose pages.
Most of the step by step directions call for a awl to poke holes in the folded paper to make it easier to inset the needle and thread. I found that I could use a sewing machine needle, and forgo the purchase of an awl.
The use of a heavy grade cotton thread assists in adding strength to the signature and durability to the finished journal. Here is where I struggle with my handmade paper.
The handmade paper is so fragile that the needle makes too big of a hole and the thread tears the paper. Instead of sewing my handmade journals, I've tried using wood glue to hold the pages together.
Six signature gathered together with a gauze binding and glue finish the internal body of the journal. But, we'll leave that for tomorrow's project.
Sunday, January 10, 2010
A Paper Facial
A cold winter day is a perfect day for a hot, steamy facial. At least, that was my thought as I ironed through 40 sheets of paper, today. My camera couldn't capture the steam that pours off the sheet of handmade paper, during the ironing process. The dryness my skin endures working in the cold water during the pulling process is replenished with moisture during this ironing process.
I make paper in batches of 30-40 sheets and set them to air dry. In the wintertime, drying takes so long that I help speed up the process with a little help from my iron.
The use of old sheets and cotton fabric on top of a wet sheet of paper acts as a cover and keeps the paper smooth and assists in preventing the iron from tearing the wet paper. The paper is usually many shades darker when it's wet. I'm never really sure what the color will be until the paper is completely dry. Once I've ironed the sheet close to dry, I slowly tear back the cotton so that I can lightly run an iron across the face of the paper.
The final product is still fragile. Once I've extracted as much water as possible with the iron, I put all of the sheet together and stack a few heavy books on top so they will remain flat until I'm ready to use them.
Journals are on my agenda.... next weekend.
Monday, January 4, 2010
Benson Grist Mill's Pioneer Days
In the blistering heat of early July, a quaint festival known as Pioneer Days is held at Benson Grist Mill, in Stansbury Utah. I was lucky to participate as a paper maker, offering demonstrations to kids of all ages.
Working outside has its benefits. The first advantage is that the Utah sun dries paper in about 20 minutes, compared to the day and a half in the wintertime. Most weekends in the summer time I make paper on my patio and take advantage of the sun's drying powers. The other benefit to working outside is that my kitchen stays clean and isn't speckled with bits of pulp and sloshes of water. I have found paper pulp on cabinets four feet away from my workspace and can't for the life of me figure out how it gets across the room.
Setting up an outdoor booth has its challenges. To make paper, a water supply is necessary. I was lucky that the festival committee placed me on the lawn (did I mention they gave me a shade tree too) and near a water hose. I wasn't as lucky when it came to the wind. Our $30 tent structure from Family Dollar Stores barely held the afternoon breezes that tore through the yard.
All in all the experience of demonstrating paper was a good one. I was surprised how many people told me they remember making paper at one time or another and yet it seemed to me that they still marveled at the process.
GIGO was one of two lessons that I wanted people to remember. GIGO=Garbage In, Garbage Out. My paper is made with quality recycled paper found in my office. I don't use dryer lint, newspaper, or heavy ink recycled paper in paper making. My paper is also chemical free. I don't buy chemicals to break down plant fibers, and I don't use chemical additives to color my paper.
Lesson two don't be afraid to try something. Countless children come to my booth to try their hand at paper making. They jumped in, got their hands wet and pulled paper without fear. It was the adults in the crowd that needed extra coaxing to try their hand at the lost art. Why do we lose faith in ourselves as we grow older? Why are we afraid to try something new?
The only disaster of the day was when we arrived home and unloaded the car. My loving husband who is always anxious to support my endeavors and help in any way possible, dumped an entire batch of paper pulp in the backseat of our car. Needless to say, we're still cleaning up purple paper pulp from the carpet.
I'm very thankful to the Grist Mill General Store for featuring my journals and note cards during the summer of 2009.
The Grist Mill will open again in May 2010. If you're looking for a quiet drive to a quaint village, think about driving to Stansbury Utah and visit the Grist Mill. My journals and note cards will be there again this next summer.
Subscribe to:
Posts (Atom)